Chicago-Style Deep Dish Uno's Pizza
By David J. Stewart
January 2008 | Updated March 2019
 Born
and raised in Chicago, I spent 37 years of my life there. Bar none, the best pizza in Chicago (in my humble opinion)
is Pizzeria Uno's (or Duo's, which is their other restaurant
a block away). Some of my fondest childhood memories is
going to Duo's pizzeria with my family.
Born
and raised in Chicago, I spent 37 years of my life there. Bar none, the best pizza in Chicago (in my humble opinion)
is Pizzeria Uno's (or Duo's, which is their other restaurant
a block away). Some of my fondest childhood memories is
going to Duo's pizzeria with my family.
There are now dozens of Uno's locations on the east coast and across the United States. I also found one on the west coast when I visited San Diego, California at the Fashion Valley Mall. The pizza there is authentic! I even met a Korean man in Micronesia who showed me his Uno's pizzeria card from the Uno's restaurant in South Korea. The pizza is that good!
Here's my best attempt at recreating their delicious secret recipe. When younger at home my kids used to ask for this pizza often, which is what matters most to me.
Dough Recipe (makes 4 small pizzas or two large)
- 2 packages active dry yeast original (I store dozens of extra yeast packets in a sealable gallon-size bag)
- 2 cups warm water (I use bottled water, microwaved for 125 seconds).
- 1/2 cup vegetable oil (I use corn oil)
- 2 tablespoons olive oil (Extra Virgin Bertolli brand is the ONLY oil I use... it has a wonderful fruity aroma)
- 1/2 cup yellow cornmeal (grain bugs like cornmeal, so I store extra in a gallon-sized sealable plastic container)
- 4 1/2 to 5 cups all-purpose flour (plus an additional cup for working with the dough. I use unbleached flour.)
- 2 teaspoons salt (I originally never used salt, but I think it tastes really good with it. You can leave out the salt if you don't want it, and the crust will still taste wonderful. Two teaspoons may seem like a lot, but it works well.
Microwave the water to warm it up, but not so hot that it feels hot; WARNING: water at 138 degrees Fahrenheit kills all your yeast!). Dissolve the yeast into the water. Pour into large mixing bowl, adding the vegetable oil, olive oil, cornmeal and the flour gradually. Mix by hand (or with a small electric mixer) as you add the remaining flour. The pizza dough will become too thick, to use a mixer, after adding more than one cup of flour. So from that point on, hand knead for a couple minutes. If the dough still sticks to your fingers, you need to add some more flour. The dough is ready when it stops sticking to your hands. Leave dough in covered bowl (I put a couple paper towels over the bowl) and allow to rise until doubled. Punch down and allow to rise again and you are ready to make pizza!
Lightly coat your deep-dish pizza pans with Extra Virgin Olive Oil (any brand is fine, just so long as it has that fruity olive oil smell). The dough recipe that I have given you makes enough dough for either two large pizzas or four small pizzas (9 inch wide baking pans, 1 inch deep). I use the small baking pans. Place a handful of dough in the pan and push it out to the edges using your fingers. The olive oil in the pan keeps the pizza from sticking to the pan after baked. Work the dough up the sides of the deep-dish pan. Put in enough dough so that you can kneed the dough crust up the side of the pan. Press the dough thin throughout the pan. This is important because the dough rises considerably while baking. Unless you want inch-thick crust, you need to work the ball of pizza dough really flat and make sure that it's only approximately 1/4 inch thick (which is very thin). It doesn't need to be exact.
TIP — FREEZE THE DOUGH TO MAKE DOUGH DAYS AHEAD: By freezing my dough, I can have a pizza ready to eat, from start to finish, in less than 45 minutes!!! It is convenient to freeze the dough days ahead. I haven't noticed any loss in texture, flavor or appearance from freezing. I place the fresh-made dough into plastic quart-sized freezer bags. Squeeze the air out of the bags, gently flatten them, and store them in the freezer...
NOTE: I always try to make my dough ahead of time. After the batch of dough is done (it takes about 3 hours for each batch of dough), I divide the dough into four balls and freeze them separately in quart-sized freezer Ziploc plastic bags. The dough can be stored in your freezer for months (I do... it doesn't affect the taste. Just make sure that you use the FREEZER bags, which are thicker to prevent freezer-burn). I usually make 2 batches of dough in a day, which gives me eight balls of pizza dough. So anytime I want an Uno's style pizza, I just grab a ball of frozen dough and let it thaw for one hour and I can make a pizza in about 1 1/2 hours total.
When you want to make an Uno's style pizza, it takes about 45 minutes to thaw the dough (it thaws quickly) and then 45 more minutes to make and bake it (or, you can thaw it in the microwave for 2 minutes, but use “THAW,” not “COOK” mode, or you'll ruin the dough. By using the 2 minute “thaw” method to ready the frozen dough, I can make a pizza pie from start to finish in less than 45 minutes on demand. I prepare the pizza while the oven takes 15 minutes to preheat.
FREEZING NOTE: I learned this the hard way - At first my pizza dough froze just fine, and it rose when I removed it weeks or months later for use; however, then I set my freezer to deep freeze at its lowest setting, and it killed my yeast. Oh boy, not good! So you can only freeze your yeast at normal freezer temperatures. If you set the thermostat too cold, it will kill the yeast, and it won't rise. Since I like my freezer as cold as possible, because I like rock hard ice-cream, I just make my pizza dough fresh each time. To each his own!
SAFETY NOTE: Always ask if someone is allergic to YEAST before sharing your pizza with others, because it could hurt them if they are. Some people are very allergic to peanut oil, seafood and yeast.
BETTER FLOUR MEANS A BETTER QUALITY PIZZA: I use unbleached or organic flour, which makes me feel better eating the pizza. I haven't noticed a difference in the flavor, but I still like to use unbleached flour. Organic means no GMO! The wonderful smell of the yeast-rising dough throughout your home will make everyone HUNGRY!!! “Unbleached” flour simply means that it hasn't been processed as much as “bleached” flour. Anything less handled by man is bound to be healthier for you. It's a sure way to make a great pizza pie. And of course, organic is the healthiest flour (and twice the price). I use the unbleached, a compromise in the middle. The more food is processed, the more it loses nutritional value and natural qualities. Technically, all flours are bleached, but with unbleached flour it is allowed to naturally bleach over time, whereas they use chemical bleaching agents in bleached flour to speed the process.
TIP —
I ALLOW THE DOUGH TO RISE FOR 12-24 HOURS (COVERED OR IN A
PLASTIC BAG). THIS GIVES THE DOUGH A WONDERFUL RICH YEASTY
FLAVOR! I usually make
two batches of pizza dough at a time, which makes EIGHT
dough balls. I then put each dough ball into a separate
quart sized plastic freezer bag and freeze them (I flatten
the bags with my hand, letting the air out, to nicely stack
them into the freezer). When I want to make pizza, I'll take
one bag out of the freezer and set it on the table overnight
until the next day, and then I know it'll have that awesome
yeasty flavor! Try it, you'll LOVE IT!
Pizza Toppings & Baking Pans
I used to make the pizza sauce for all the pizzas in a big bowl, but I stopped doing that because I have more control over seasonings by making one pizza at a time. I have a few small 9-inch baking pie-pans that I use. It makes sense to use a pie pan, since you're making pizza pie. There are different types of baking pans. I like the pie pans with the 45-degree angle at the edge, so I can easily slip the spatula under my pizza. I don't like the sharp 90-degree angle pans, where it is difficult to slide the spatula under the pizza when it's done.
So for one pizza, I use one 14.5 ounce can of TOMATOES per pizza. The type of tomatoes (crushed, diced, whole) depends on what you prefer. I usually buy the fire-roasted diced tomatoes if they're available, but regular are fine (which has a little salt in it). That's fine (unless you don't want any salt). If you're making a bigger pizza, you may prefer to mix a can of diced with a can of crushed, but it's completely up to you. I usually just use diced tomatoes (there's a little salt already in the can, but its not much). I use my hand, over the sink, and drain the can by pressing my fingers into the can. It works for me.
NOTE: Tomatoes have many great health benefits; including being a great dieting food, because tomatoes are CATABOLIC (meaning that they burn more calories than they contain). Tomatoes are great for preventing prostate cancer in men.
IMPORTANT NOTE — DRAIN TOMATOES OF WATER IN THE CAN, OR ELSE YOUR CRUST WILL BE SOGGY!
Here's my latest recipe for pizza sauce. I originally experimented with numerous ingredients, but often over-did-it with the spices and didn't like the flavor, so then I settled on just the following simple ingredients, which is the best pizza ever! I've added way more notes than you need, but I want to give you all the helpful details.
For years now I have been making these awesome pizzas from memory, without even looking at my notes or list of ingredients. I eat them that much! There's 6 ingredients in the crust (water, yeast, olive oil, corn oil, yellow corn meal, flour). There's 5 ingredients in my pizza sauce (tomatoes, olive oil, oregano, basil, salt). It's that simple!!! That's 10 ingredients, and if you sprinkle a little Parmesan cheese on top afterwards (not too much or you'll change the pizza's flavor), that's 11 ingredients TOTAL!!!
PIZZA SAUCE — Simple is best (I only use four ingredients in my sauce: Diced tomatoes, extra virgin olive oil, salt and oregano)...
- One 14.5 can of TOMATOES (I like diced tomatoes, but you might prefer crushed, whole, or a combination thereof).
- 1 Tablespoon of extra virgin olive oil per each 14.5 ounce can of tomatoes.
- 1 teaspoon of OREGANO per each 14:5 ounce can of tomatoes (or to taste).
- SALT to taste. BE CAREFUL NOT TO ADD TOO MUCH! I usually add two big pinches (whatever I can pick up with three fingers) of regular table salt per 14.5 ounce can of tomatoes. I'd say 1/4 teaspoon of salt is perfect. NOTE: if you add too much salt, simply add another can of tomatoes to dilute the mixture. It's always best to add a few dashes of salt to your pizza sauce and then stir and taste. If there's not enough salt, your pizza will taste bland like it's missing something. If there's too much salt, well, you know what that will taste like... SALTY! Again, it is important that you have ENOUGH salt, or your pizza will taste bland. This is the trickiest part of making your pizza... getting the amount of salt right! What I do I pour a little salt into my hand, so I can see the exact amount, and then I toss it into the pizza sauce bowl. REMEMBER, YOU CAN ALWAYS ADD MORE SALT, BUT YOU CANNOT REMOVE ANY!!!
NO GARLIC!!! I used to use garlic, but I felt it was too overpowering , so I don't use any garlic nor garlic powder. If you want to experiment, you can try all kinds of ingredients: pepper, marjoram, garlic, onion powder, basil, et cetera (BUT I DON'T USE THEM ANYMORE). I use to use these, but my taste buds finally decided that less ingredients is better. If anything, I'd use a little basil (1/16 to 1/8 teaspoon).
THAT'S IT! THESE SIMPLE INGREDIENTS MAKE THE BEST PIZZA IN MY HUMBLE OPINION. Just some Oregano, olive oil, diced tomatoes and a little salt.
For cheese, I buy whatever Mozzarella is available. I either buy bulk packages and slice it myself, or I buy a big bag of shredded Mozzarella (preferably). I use about 1/2 pound per each small pizza. Make sure to place the sliced cheese on top of the dough, and then pour the pizza sauce OVER the cheese. This prevents the cheese from burning in the 475 degree oven. ALWAYS PREHEAT YOUR OVEN FIRST TO 475 degrees!!! I cook my 9 inch pizzas for 26-28 minutes.SAUSAGE IS OPTIONAL: Sometimes (if I'm craving sausage pizza) I buy hot Italian sausage and place a couple links (or whatever) in a pan with about 1/2 inch of water. I cook the sausage under medium heat (with the lid on) for about 10 minutes, turning the links over after about 5-minutes. Then take scissors and cut the sausage into little pieces and scatter across your pizza. The sausage doesn't have to be fully cooked, because it will finish cook in the oven. I put my sausage over the pizza sauce, and then add the cheese over the sausage. I rarely use sausage, because I love a deep-dish cheese pizza, but I wanted to mention it, depending on your tastes. It's something to try (or you can make a pizza half-and-half, that is, only put sausage on half of the pizza). I just make one cheese pizza and the other sausage. A plain cheese pizza will always be my favorite!!!
DRAIN YOUR CANNED TOMATOES WELL. IF YOU DON'T, THE EXCESSIVE WATER WILL MAKE YOUR DOUGH SOGGY EVEN AFTER BAKING.
I As mentioned, I have learned by trial and error not to use too much seasoning. Be careful not to add too much of any one ingredient. If you mess up and add too much, just open another can of tomatoes and add it to the mix to dilute it some.
Also, don't forget to wipe olive oil in the baking pan before working in the dough (this helps it brown just a bit while cooking).
Place the cheese in tile-like layers on the bottom of the pie (cut about 1/8" to 1/4" inch thick). Pour pizza sauce over cheese. Drizzle a little extra olive oil over the top of the pie, and you are ready to bake. When pizza is done, sprinkle grated PARMESAN CHEESE across the top of the pizza.
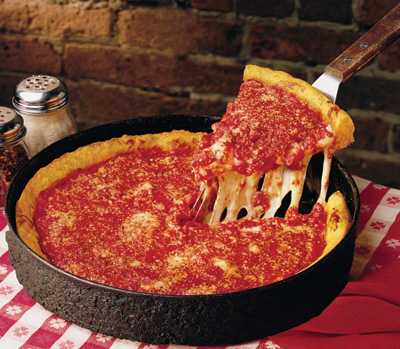
Pizza pie like this
wasn't meant to be eaten as the slice; but rather, with a
fork and knife piece-by-piece (while still hot). As you get down to the crust,
then you can eat it like regular pizza. This is an awesome
pizza, with all the melted
cheese and tomato topping oozing off... Emmmmm.
This pizza is great reheated the next day! To reheat
refrigerated pizza, bake the pizza in the oven at 350
degrees for 26 minutes.
Baking Instructions
BAKING TIME DEPENDS UPON THE TYPE OF OVEN YOU HAVE
I'll always prefer
a GAS OVEN over electric. Cook the pizza on the BOTTOM rack
at 475 degrees (preheated) for 25 minutes! This is so
that the crust can cook well. Don't overcook
the pizza or the crust will be rock-hard. The pizza is done
when the crust is golden brown. For a gas oven, 25 minutes
at 475 degrees works fine for me. I don't check it, not even
once. The oven must be preheated. I usually use the top oven
rack because heat rises, but the bottom is OK too.
If the pizza crust lacks some crunch when you cut it, with a knife at the middle of pizza, it needs to be cooked a little more. If the crust is soggy, you may not have drained the can of tomatoes enough at the beginning. Making pizza is an art... so don't get discouraged your first time, if it doesn't come out perfect.
For an electric range, 50 minutes. Electric is much more difficult to get right. I hate electric ranges. When I used to have an electric oven, it took 45-50 minutes to cook my pizza and I had to switch racks to get it to cook properly (about 25 minutes on the top rack, and then about 20 minutes on the bottom rack). Did I say that I hate electric range ovens! Natural gas (or propane) is superb in my opinion. If in doubt, cook the pizza for 25 minutes and then check to see if the crust is golden brown. Gas cooks much more uniformly. Remove one slice, and if it seems soft on the bottom instead of having a little crunch, bake it another 7 minutes at 475.
COOKING TIMERS: Use your stove's built-in cooking timer, or you can buy one online, or at a bigger supermarket. There are some free timers online. I used to have one on this webpage, but it wouldn't work in certain browsers, so I removed it. I don't recommend using a timer that rings once and then stops, because if you're like me, you get busy and can easily miss the alarm. You want a timer that will keep sounding and drive you nuts if you don't turn it off, so that you won't burn your pizza! If you don't have a timer, here's one online that keeps ringing until you turn it off (make sure that your computer's volume is turned up). I recommend buying a kitchen timer if you have a tendency like me to forget what's on the stove.
If you undercook the pizza, it will be soggy from the moisture in the tomatoes. When properly cooked, it's like a pizza pie. The crust should be mildly firm and crispy when done.
Lightly coat the deep-dish backing pan with extra virgin olive oil before spreading the dough into the pan. This makes the pizza come out easy when done, plus helps to cook the crust nicely, giving it a little crispiness. I don't generally like crispy crust, but I prefer it for this deep dish pizza.
I wait until the pizza is out of the oven before sprinkling Parmesan powdered-cheese across the top (you buy it in a container). I just sprinkle Parmesan in the middle of the pizza, so it doesn't dominate the flavor.
CAUTION: Oven times can vary greatly. I originally wrote this recipe when I only had an electric oven. Then I got a propane gas stove and burned my pizza. The crust was as hard as a rock. Cooking times are much shorter for a gas range...
ELECTRIC OVEN - It's tricky to cook pizza in an electric oven, because of uneven heating. If you don't want soggy crust, it's important to bake the pizza on the bottom rack for at least 20-25 minutes. I bake the pizza at 475 degrees in a preheated oven, first on the top rack for 25 minutes, and then on the bottom rack for 20-25 minutes.
GAS (OR PROPANE) OVEN - I cook my pizza on the bottom
rack for 27 minutes in a preheated oven at 475 degrees. You DON'T
need to switch racks in a gas oven. I like a little crunch in my
pizza pie crust, so I go to about 25 minutes. Otherwise the crust
might seem too soft. If you like crisper pie crust, let it cook
longer.
Also, I always rub a Tablespoon of extra
virgin olive oil around the baking pain before I place the dough
into the pan. This does three cool things:
If your pizza crust seems to be soggy (from the moisture in the tomatoes), not a problem... cook it some more. Remember to drain your canned tomatoes better next time, to prevent a soggy pizza. You don't have to drain every last drop of water, just most of it. This will prevent soggy crust. I generally use diced tomatoes. I don't like using whole tomatoes because of the green pits. I don't use crushed tomatoes because they are too liquid and it is very difficult to drain the water from them. Diced tomatoes are the best!
To reheat an already cooked pizza, set the oven to 350 degrees. You don't need to preheat the oven. It usually takes about 10 to 15 minutes, depending on whether it is chilled or frozen. Make an Uno's pizza today for someone else and watch how happy it makes them. It is truly magic to your tastebuds!
*Please note that Uno's didn't sanction this webpage. I just love Uno's pizza so much that I wanted to share what I've learned with others, so you can be as happy as I am when I make and eat them!!! God is good to us all! Psalms 145:9, “The LORD is good to all: and his tender mercies are over all his works.”